
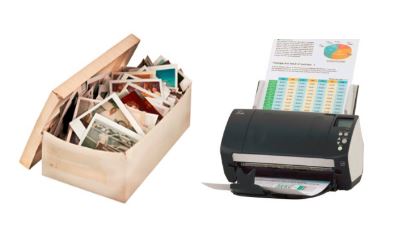
If you need an auto feed photo scanner, then the Fujitsu FI 7160 should be your choice. It has outstanding image quality which is great for photos. The resolution goes up to 1200dpi through the driver.
It can scan in color or grayscale depending on what photos you input. And the pictures scanned come out at 60 per minute which is very fast, even for a normal document scanner.
The third and last thing is the fact that you can also use it for documents. It will perform outstandingly even when you have thousands of documents every day. But just make sure before scanning photos you clean the scanner very well. Head to our Fujitsu Cleaner Alternative article and there you will find everything to make sure your scanner is clean.
Table of contents
How this Auto Feed photo scanner works
The ADF system the scanner has makes sure that every picture or photo is feed through the scanning equipment automatically. This highly improves the productivity of the process. We are not big fans of the flatbed scanners most use for photo scanning.
You probably remember that you had to lay the photo and hit scan. Wait for at least 10 seconds and then go again. I can bet you wanted to through the scanner out the window 10 times a day. Some claim quality is better on flatbeds but I am not really sure about that.
Visible quality of most flatbed scanners I have seen is nowhere near the Fujitsu FI 7160. More or less, both images look the same. I would say that with the “Bright” feature the Fujitsu has they look much better.
Optics and lenses needed to scan photos in high quality
The Fujitsu has a 600dpi resolution through the software and 1200dpi through the driver. But you will be surprised how good a photo looks even at 300dpi. For 99% of the users, the scanning quality will be enough and they will be impressed if they had a scanner in the past.
I have checked for example the Epson FastFoto FF-640. A lot of specialists I’ve heard claimed that the quality is very good. What I can tell you is that either they have not checked the product or they are endorsing it for financial reasons.
First of all, to scan color images you need a CCD sensor. The Fujitsu has a CCD sensor and this improves the quality dramatically. The Epson FF- 640 only has a CIS sensor. The color gamut is much, much smaller than for a CCD sensor. Don’t be fooled by claims that it uses hybrid CIS or high-quality CIS. CIS is CIS. Small color gamut and a lot of times very bad focus.
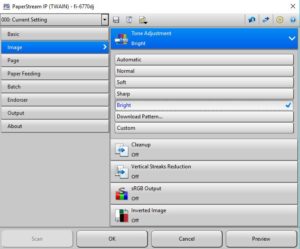
The Fujitsu FI 7160 has a very interesting feature in the Paperstream driver. It’s called “Bright” and basically scans color images and delivers them a bit brighter than on the actual print. Trust me, this effect is great and for most of the users, it will be of great help.
How to set up your Fujitsu FI 7160 scanner for photos
First of all, I have to tell you that the settings for photos which I will show, will also work with the entire Fujitsu FI scanner range. I will show you what to set up in Paperstream IP and in Paperstream Capture.
So these apply not only to the Fujitsu FI 7160 but you can use the settings and apply them to the entire range. The capturing units are also more or less the same on all the scanning equipment that Fujitsu provide.
The Paperstream IP is the driver and there we will set most of the image features. The Paperstream Capture is batch scanning software which focuses more around delivering files to the proper place and so on.
Settings in the PaperStream Capture
Step 1 – Hit the Configure Profiles menu and click +. Either that or you can clone a profile.
- Enter the desired profile name and a short description.
- Head to the Destination menu. Enable the Batch Folder. I will explain in a moment what that does.
- Click the Name Rule and Browse. Manually select the drive and folder where the scanning will be done.
- This is where the Batch Folder comes in. It will create a new folder for each scanned batch in the destination folder.
Step 3 – In that same destination, we have to select the file format and the compression.
- Choose the TIFF format. The other setting which you have to enable is the No Compression.
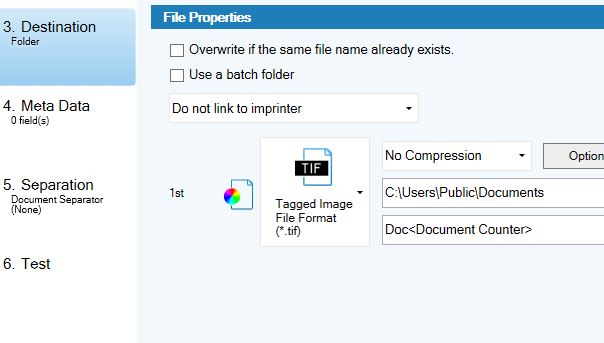
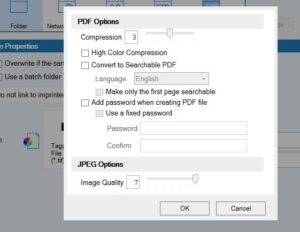
- If you are thinking that the output TIFF files are too big and using too much space than using the second image. Instead of using No Compression, select JPEG. After that select options and move the JPEG image quality to 7. The image will be compressed but not with that much data loss.
Step 4 – Just hit save, and the profile will now carry the new settings you have made.
Step 5 – Don’t click close, now go back to the source and you will have to adjust the scanner profile which we will explain in the next paragraph.
Settings in the Paperstream IP
Step 1 – Go to the source menu. If you have installed your scanner correctly it should be there. Don’t hit anything and just click EDIT. In the below photo you will see our settings for photos. Make sure you are scanning both sides. We will explain a bit later why.
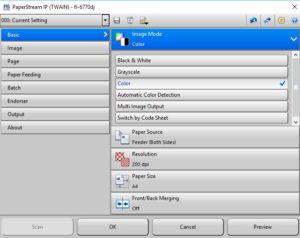
Step 2 – The settings for Image should be as we show you below. The Bright feature really helps for Tone Adjustment. The rest all have to be on off. Trust us, these will only make it worse for you when you scan photos.
Step 3 – Page settings to scan photos should look like in the image below.
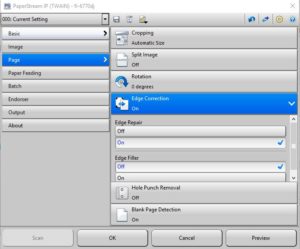
- Edge correction – Pay attention to this. Turn it on. But Turn OFF the edge filler.
- Cropping – Leave it on automatic size. But if your scanner scans face up then lay your photos face down in the ADF. If it scans face up, lay your photos face down. This way, the scanner uses the white side of the photo to adjust the cropping size. And it’s the only way for it to do it correctly. This is a TOP TIP for scanning photos and getting a correct crop. That is why we selected scanning on both sides.
Step 4 – The rest of the options should be off or are not that important really. Just save the new setting by your preferred name and you should be good to go. Remember to also save your scanning profile before you exit the configure profile window.
Notes on what else to look for when choosing scanning settings
- We will be scanning at 300 dpi or 600dpi. In our example photo, our scanner was on 200dpi. Adjust accordingly.
- When you hit Edit the source you only get a menu with only 2 options, don’t panic. On the top right of the window there are 2 opposing arrows. Click those to enable the menu with all the settings.
- As weird as it sounds we are scanning both sides. This is mandatory to get the correct cropping features.
- You can remove the back of the photos post scanning or you can select blank page removal. Either solution will work very well we think.
Scanner maintenance and cleaning
This is one of the most important aspects when scanning high-quality photos. Because you are using a photo scanner with the auto feed you will be scanning more than you would on other machines. Therefore, the scanner will get dirtier. From rollers to the paper path and last but not least lights and camera glass.
Cleaning the glass of the scanner
This is the decisive factor to achieve high-quality photo scanning. Every type of dirt or lint will be visible on the photo if you don’t clean the glass. The same goes for the lights. Sometimes, dirt or even traces of paper will be left on the lights and cause uneven lightning.
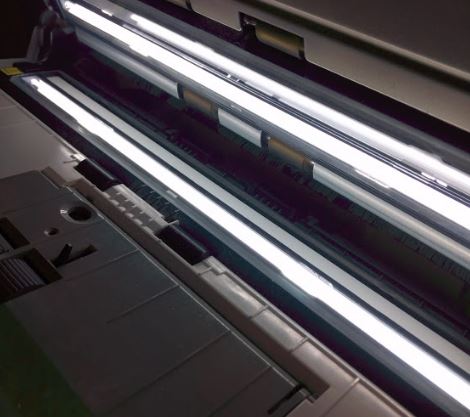
These reduce the quality of scans and in the end, you might be unsatisfied with the product. But as long as you maintain it, with regular cleans during scanning, you should be safe.
Go to our article on the best alternatives to the Fujitsu cleaning products. There you will see what to buy to keep the rollers, scanning path and camera glass clean.
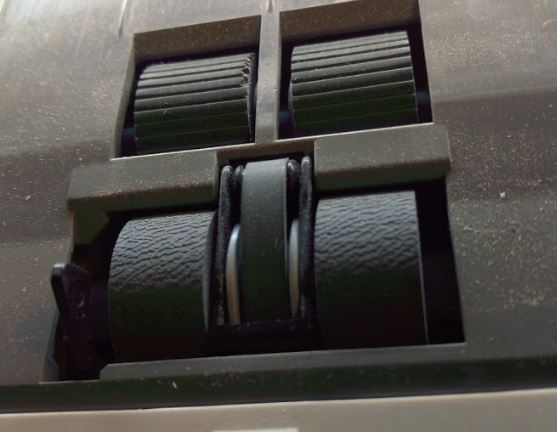
Cleaning feed rollers and paper path
We will advise you to follow the above link so you know what to buy to keep your scanner clean. Same goes for the rollers. You need a cleaning cloth and a cleaning solution for rubber. These will help keep your scanner rollers into shape and have optimum feeding of photos. Make sure rollers are clean, otherwise you might find that dirt has moved from them onto the photos.
The paper path also needs cleaning from time to time. We recommend you vacuum the path first. After that use a cloth with some water to remove dust. In the end, you should use an antistatic solution like the Castle Plexo Anti-Static Plastic Glass Cleaner, 20 oz. Carefully clean the path so the photos feed more reliably and don’t transfer dirt or dust onto the glass.
Our choice for best photo scanner with auto feed – Fujitsu FI 7160
As we mentioned above, we would use the FI 7160 to scan photos reliably and fast. We have quite a number of reasons for choosing this equipment so we will go through them one by one.

Fujitsu FI 7160 – Check price on Amazon now
- Resolution – 600dpi ( 1200dpi through the driver ) .
- Maximum Scanning Size – 210mm by 2.5 meters
- Capturing technology: High-quality CCD sensor + LED lightning
- Speed: 60ppm/120ppm A4 documents ( use a slower speed for photos)
- ADF capacity – It will hold around 50 photos or 80 documents
What we like about the Fujitsu FI 7160
- It has an auto feed technology which makes scanning so easy. Great productivity with less effort.
- The scanning quality is very good. Photos come out bright with a very good color accuracy.
- CCD camera technology achieves the good color accuracy and helps with the general quality of the output.
- Paperstream IP and Paperstream Capture work together to achieve great results. You can use them for both photo scanning and document scanning.
- Paperstream IP offers different data compression. We would recommend you use no compression so images look great.
- Great also for scanning documents. It really is a professional scanner and the price is very good for what it can do.
What can be improved on the Fujitsu FI 7160
- The cropping can be a problem, especially on darker images. But there is a great working around for this. Scan photos face up, and the scanner will use the white on the back of the photo as cropping reference.
- To scan photos you still need to clean the scanner a lot. To achieve optimum results, we recommend cleaning at 50 – 100 photos intervals. It might seem a lot, but it doesn’t take that long to do it.
- There is the FI 7260, with a Flatbed unit included. A great machine, but it costs several hundreds of dollars more.
We have another article on the Fujitsu Fi 7160 scanner, so please head there and check it out.
How useful was this post?
Click on a star to rate it!
Average rating / 5. Vote count: